This post contains affiliate links. Please see our disclosure policy.

While I enjoy sharing everyday recipes and Sunday Dinner menus, I figured that I should also begin sharing the building blocks to my cooking. Strong kitchen fundamentals provide the foundation for more advanced kitchen applications needed down some of the more winding recipe roads.
If you are a regular reader, you know that we love our onions. Shallots, yellow, red, sweet, and green– we enjoy them all raw, roasted, creamed, and pickled. Caramelized onions, however, take the front seat in our house. I use them in baked breads, sandwiches, soups, and appetizers. Oh, and as a side to roasted meats, with a sprinkling of freshly grated cheese —yum! The process of cooking the onions low and slow is long, but crucial for achieving that soft, tender, sweet, caramelized taste. This method also provides the desired texture and appearance. The upside is that they can be made days in advance and stored in an airtight container in the refrigerator or even frozen. Mine never seem to make it to the freezer.
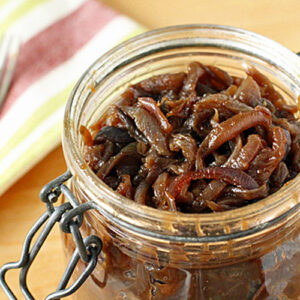
The caramelized onions in this post were made with red onions. I do the same with yellow onions. There is one difference in the cooking process between red and yellow onions. When caramelizing red onions, I use water to deglaze the pan and stir in a teaspoon of balsamic vinegar at the end. When cooking with the yellow onions, I like to use white wine instead of water when deglazing the pan. Sometimes I add minced garlic or herbs. I will include these variations in the recipe below.
“As an Amazon Associate, I earn a commission from qualifying purchases that you make from the links within my posts and recipe cards with no added cost to you.”
Caramelized Onions
Ingredients
- 2 ½ pounds of onions, red or yellow
- 2 tablespoons unsalted butter
- 1 tablespoon neutral oil, I use Safflower
- 2-4 cloves of garlic, finely minced (for yellow onions)
- 1 tablespoon fresh thyme, chopped (for yellow onions)
- 1 teaspoon kosher salt
- ½ teaspoon granulated sugar
- ¼ cup water for red onions or ¼ cup white wine for yellow onions
- 1 teaspoon balsamic vinegar, for red onions
- kosher salt and freshly ground pepper to taste
Instructions
- Trim the tops and root ends of the onions and cut in half from top to bottom. Lay one half on the surface of a cutting board and cut the onion lengthwise following the grain of the onion. This will help the onion soften. Repeat with remaining onions.
- In a large skillet over medium heat, melt the oil and butter. Add the onions and stir to coat the onions in the oil and butter. Sauté for 10 minutes. If using yellow onions, add the garlic and thyme. Season with 1 teaspoon of salt and ½ teaspoon of sugar and cook for 1 hour stirring occasionally. Do not be tempted to increase the heat. The long and slow cooking softens the onions before they can be caramelized. Increase the heat to medium-high and cook, stirring frequently, until browned and caramelized, about 25-30 minutes. Deglaze the pan with ¼ cup water or wine, scraping up any browned bits. Continue to cook until the liquid has evaporated. Add the balsamic vinegar to the red onions. Season to taste with salt and freshly ground pepper. Enjoy!
Nutrition
Nutrition information is automatically calculated, so should only be used as an approximation.

Happiness is…returning from a trip with an inbox filled with e-mail feeds from The Galley Gourmet. It's hard to pick which one I am going to try first. I am really "wowed" by your caramelized onions. Your pictures and instructions are outstanding. I have never seen it explained better. I can see them on our next pizza. Love the idea of sharing your basic techniques and recipes.
This is very helpful, thanks for sharing! I was just trying to figure out how to make some caramelized onions to go on top of burgers! These look perfect.
Mom and Lauren-
Thank you and you are welcome. These onions do make it on top of our pizza and burgers as well. Stay tuned and I will be sharing a sandwich that uses the Caramelized Red Onions and the Roasted Red Pepper and Gorgonzola DIp from last week
Made these yesterday to go in a tart with a nice salty sheep's milk cheese for Sunday dinner. They turned out fantastic.
I also served them with crackers beore dinner (along with a roast beetroot dip) and they were the preferred topper.
They did seem to take longer to caramelise in the last stage then specified but that is either, a. My stovetop playing up again or, b. The humidity making them sweat more.
Will be making these again!
Nikki-
I am so pleased they were enjoyed:) The sheep's milk cheese and beetroot dip sound like a delicious pairing with the onions!
I'm so appreciative that you commented on the difference between carmelizing red and yellow onions. To quicken caramelization add a pinch of baking soda to the onions
I noticed you can your caramelized onions. Do you use a water bath or the pressure cooker? Thank you!
I did not can them. I just store them in a glass crock in the refrigerator.
Very good food