This post contains affiliate links. Please see our disclosure policy.
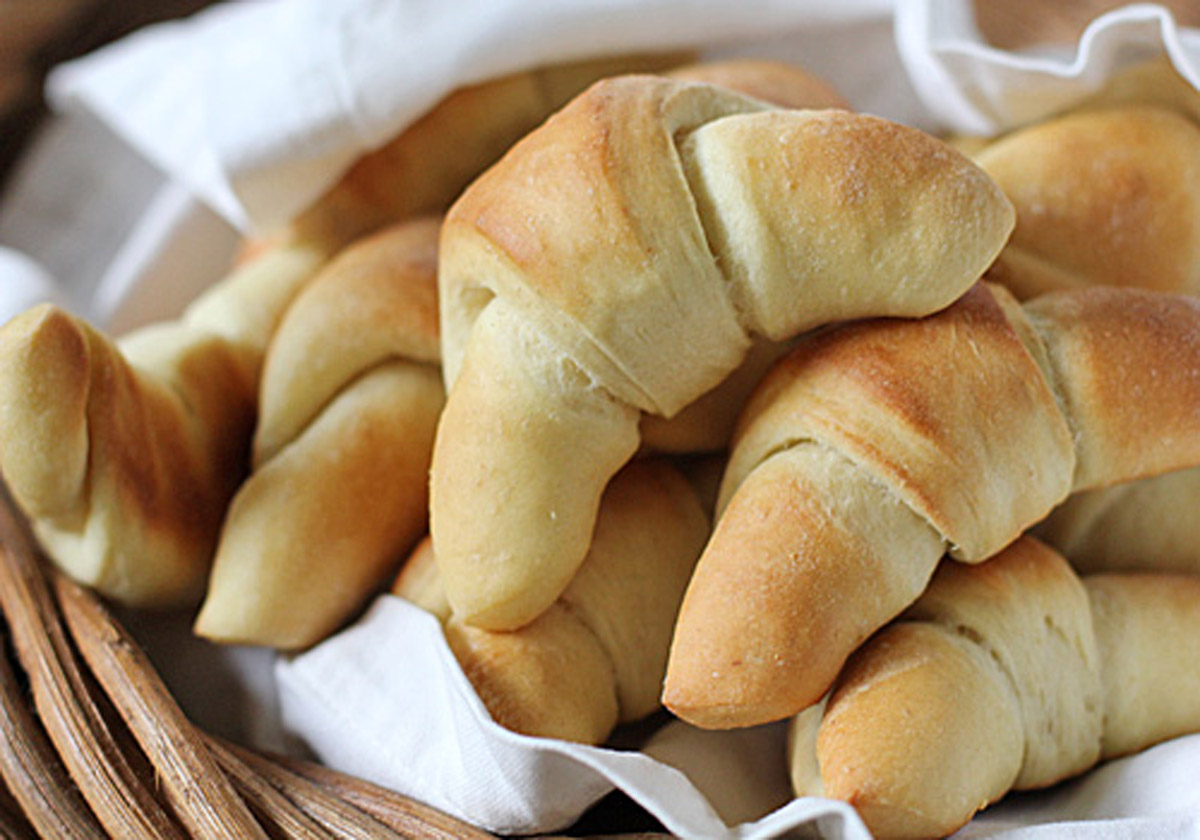
There is usually some type of warm bread at the dinner table in my house. They are a good excuse for butter consumption or a useful tool to wipe up every last bit of goodness from the plate or bowl. This past Sunday we enjoyed these crescent shaped buns that evoked memories of those rolls in a can from my youth. Enriched with milk, eggs, butter, and sugar, these rolls are tender and sweet with a good butter flavor. If you enjoy making your own bread, these are fairly simple and straightforward and I have included a few step-by-steps below. I think the only trick is to make sure the pointed end of the cut dough is rolled and positioned underneath the roll. Otherwise the rolls will unravel when baked. If that happens, no worries, the taste will still be there.

After the initial rise, turn the dough out onto a lightly floured work surface and divide the dough into 3 equal pieces, about 15 ounces each.

Roll each ball of dough into an 11-inch round.

Brush each round with a tablespoon of melted butter.

Using a sharp knife or pastry wheel, cut the round into 8 equal pieces.

Starting at the wide end of the triangle, roll the dough into a crescent shape.

Continue with the remaining wedges of dough.

Place on a parchment-lined baking sheet and allow to rise until doubled in size before baking.
These are delicious everyday rolls, but they can also be a welcome addition to a holiday bread basket. Here are some other breads you might enjoy for the Thanksgiving feast.
Buttery Pan Rolls
Pumpkin Rolls
No-Knead Country Bread
“As an Amazon Associate, I earn a commission from qualifying purchases that you make from the links within my posts and recipe cards with no added cost to you.”
Butter Horn Rolls

Ingredients
- 11 tablespoons (5 ½ ounces) unsalted butter, divided
- 1 cup warm milk, 110ºF
- ½ cup granulated sugar
- 3 extra-large eggs at room temperature
- 4 ½-5 cups unbleached all-purpose flour
- 2 ¾ teaspoons instant yeast
- 1 ¾ teaspoon kosher salt
Instructions
- In a small bowl or saucepan, melt 8 tablespoons of butter; set aside to cool. In a large bowl, whisk together the butter, milk, sugar, and eggs. In the bowl of a stand mixer fitted with the dough hook, mix 4 ½ cups of flour, yeast and salt. With the mixer on low speed, add the milk mixture. Once the dough comes together, increase the speed to medium and mix until smooth and shiny, about 4-6 minutes. (If the dough is sticky after 3 minutes, add the remaining flour 2 tablespoons at a time). The final dough will still be sticker than a standard bread dough. Turn the dough onto a lightly floured work surface, shape into a ball, and place in a lightly greased bowl. Cover with plastic wrap and let rest in a warm place until the dough is doubled in size, about 1 hour.
- Melt the remaining 3 tablespoons of butter; set aside Line 2 baking sheets with parchment paper; set aside. Divide the dough into 3 equal pieces, about 15 ounces each. On a lightly floured work surface, roll each piece of dough into a 11-inch circle. Brush each round with 1 tablespoon of the melted butter. Using a sharp knife or pastry wheel, cut each round into 8 wedges. Starting at the wide end, roll up the dough ending with the pointed tip on the bottom. (The tip must be on the bottom to prevent the roll from unraveling during baking.) Place the rolls on the prepared baking sheet 2 inches apart and curl in the ends slightly to form a crescent. Cover with a lightly damp towel and let rise until the rolls are doubled in size, about 45-60 minutes.
- Adjust the oven racks in the upper third and lower third of the oven. Preheat the oven to 350ºF. Bake until the rolls are golden brown, about 20-25 minutes, switching and rotating the rolls halfway through baking. Serve hot, warm, or at room temperature. Enjoy!
Nutrition
Nutrition information is automatically calculated, so should only be used as an approximation.


Perfect timing!
Oh, yum, yum, yum! My mom used to make a sweet version of these – I would come home from school and the whole kitchen table would be covered with these yummy delights! I would have to let the waist bands out in all my jeans if I lived next door to you!
Oh, I linked you in my blog today with your yummy Country Bread.
ahhhh these are perfection! totally need to try my hand at baking rolls! i've never made anything bread-related other than pizza crust! =)
Just made these for our Easter dinner tonight and I'm test tasting one right now… so, so good! I can tell already that this is going to be a family favorite of ours.
Please you are enjoying one:)
I just made these. These are FANTASTIC. Probably the best basic dough recipe I've ever had; and I've made quite a few. Love how it's just ever so slightly sweet. And the texture is awesome. This now my go-to dough recipe. Thanks again for the best recipes ever 🙂
You are so welcome☺!
Can these be made ahead of time? I would love to make these this Thanksgiving!
They are best warm from the oven, but leftovers do reheat well. The dough can be made the night before and refrigerated overnight for a slow rise. Remove from the oven and proceed with the shaping. Since the dough is colder the second rise will need more time to double in size, about 1-1/2 hours.
Thank you! I just need to learn what to put in the oven when..sometimes I wish I had 2 ovens!;-)